Navigating complex processes within an organization can resemble a tangled web of interconnected pathways. In the quest for clarity and efficiency, many turn to visual aids, and one such tool gaining popularity is the Swimlane Flowchart. Whether you're a seasoned professional or a newcomer to process optimization, understanding the ins and outs of this diagrammatic representation can prove invaluable. From its definition to practical applications and creation techniques, this article serves as your comprehensive guide to Swimlane Flowcharts. Keep reading!
What is a Swimlane Flowchart?
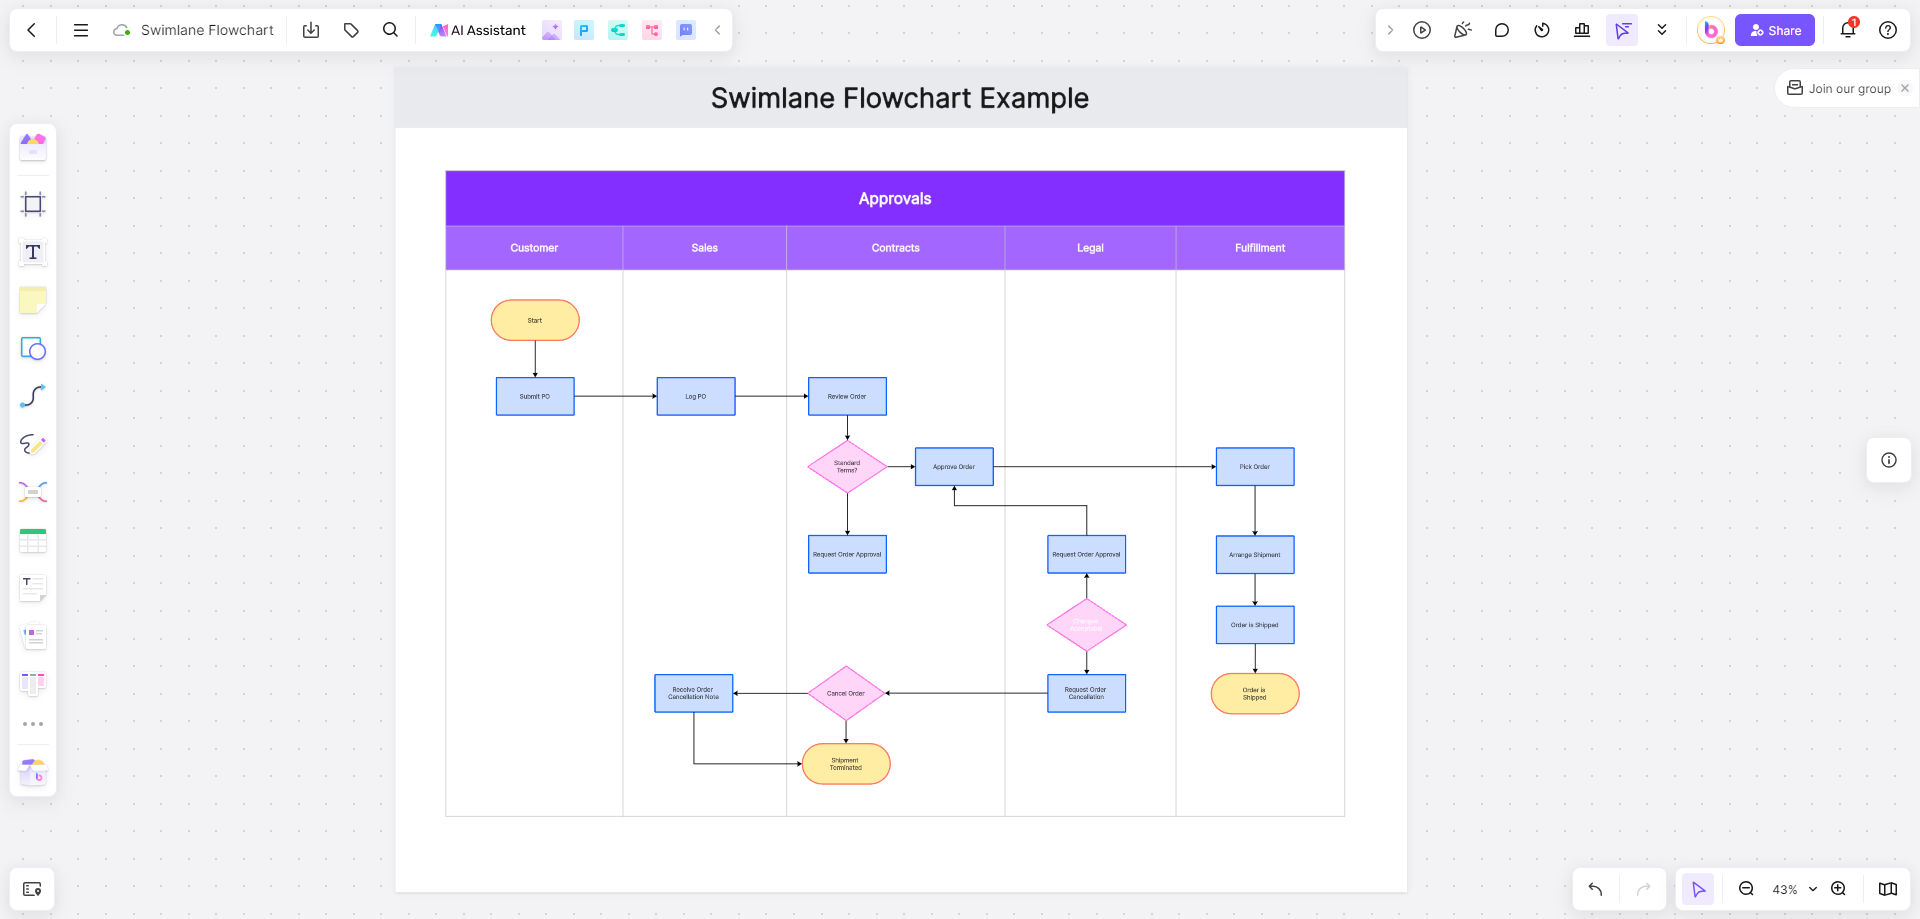
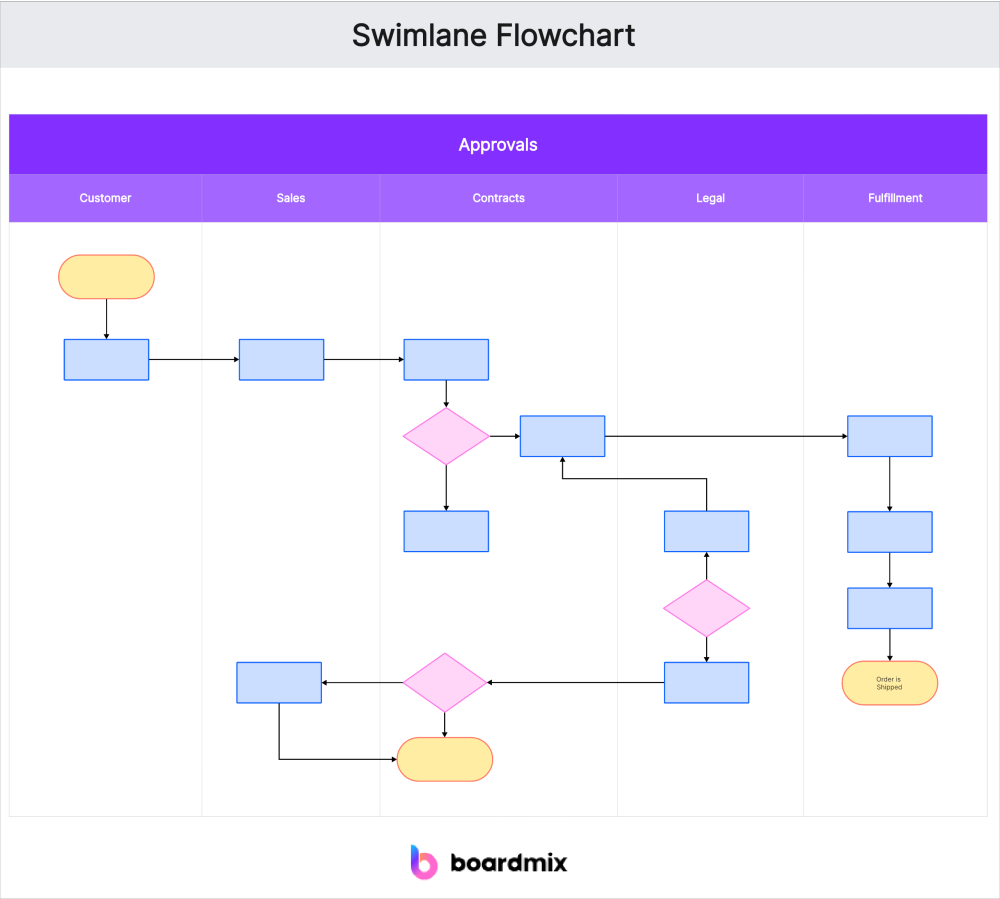
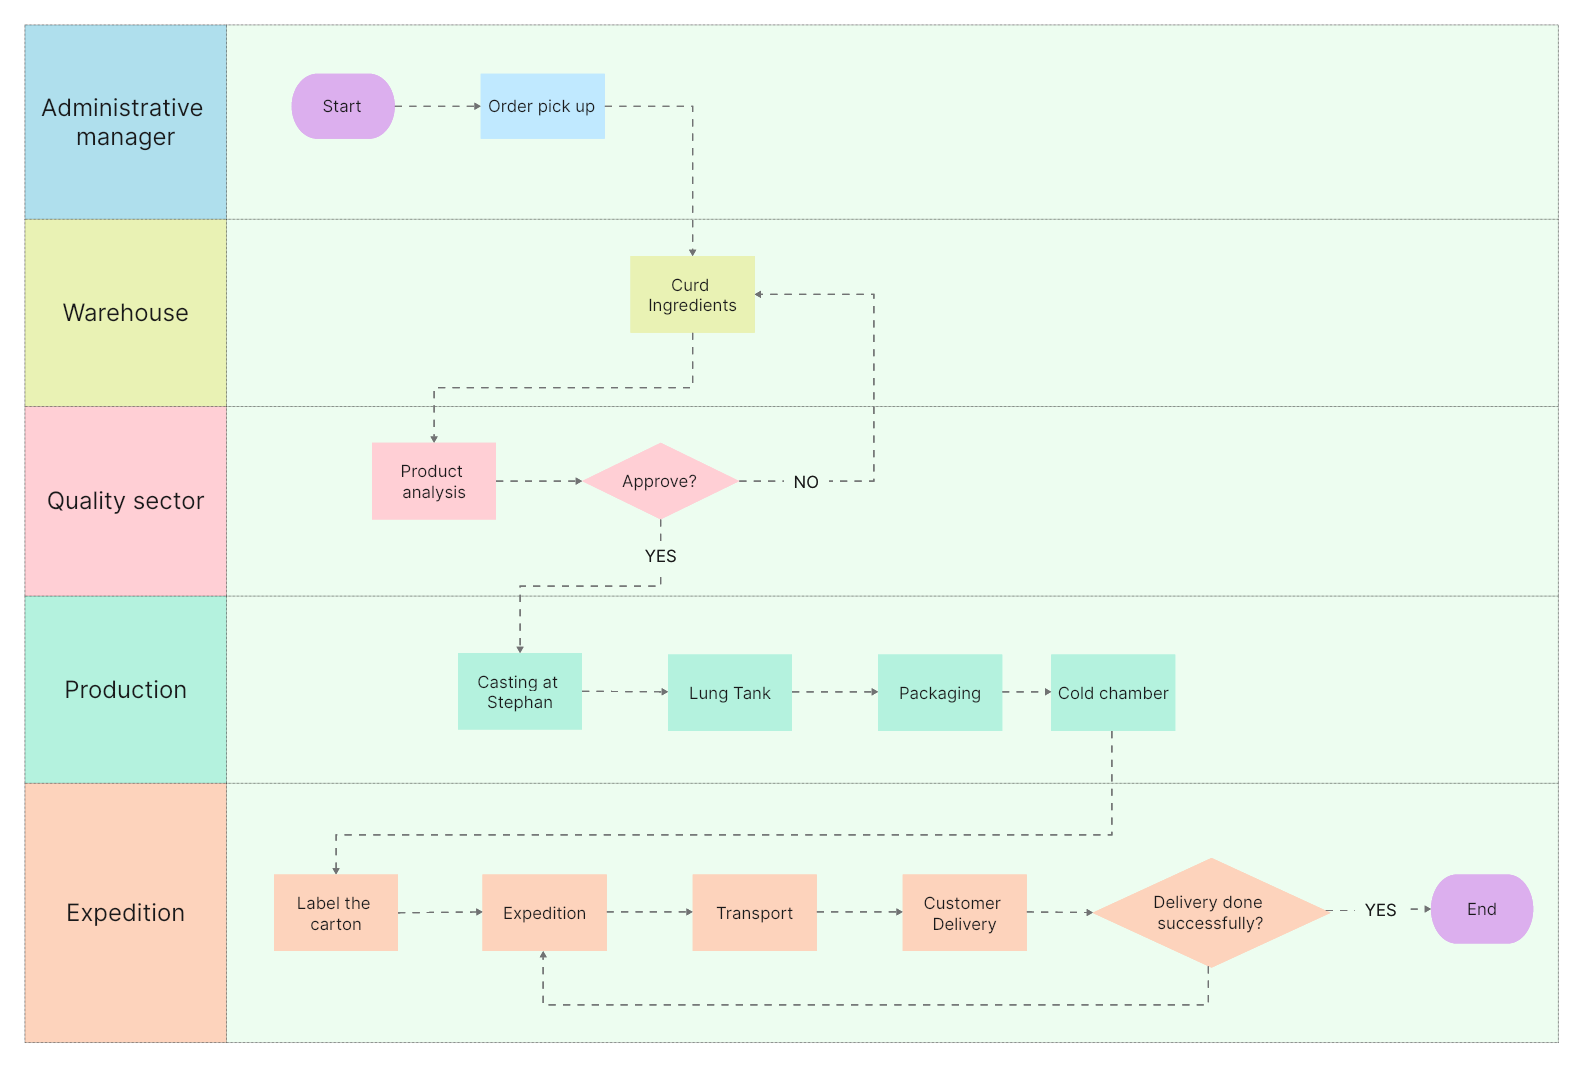
A Swimlane Flowchart, also known as a cross-functional flowchart or a swim lane process map, is a type of flowchart that visually represents a process or workflow by separating responsibilities or roles into dedicated "lanes." These lanes run horizontally across the diagram, allowing each step or activity to be assigned to a specific role or function.
Swimlane Flowcharts are particularly useful for complex processes involving multiple teams, departments, or stakeholders. By clearly delineating roles and responsibilities, they facilitate better communication, coordination, and understanding of the overall process flow. Additionally, they help identify potential bottlenecks, handoffs, and areas for process improvement.
Start Your Swimlane Diagram Here
What are the benefits of using the Swimlane Flowchart?
Clarity in Process Roles and Responsibilities: By assigning specific activities to dedicated lanes, Swimlane Flowcharts make it easy to understand who is responsible for each step in the process, reducing confusion and ensuring accountability.
Enhanced Process Visibility and Understanding: The visual representation of the process flow, coupled with the separation of roles, provides a clear and intuitive understanding of the entire process, making it easier for stakeholders to grasp and analyze.
Effective Communication of Process Handoffs: Swimlane Flowcharts highlight points where tasks or information are passed from one role or function to another, enabling better coordination and minimizing potential delays or misunderstandings.
Identification of Inefficiencies and Bottlenecks: By mapping out the process flow and roles, Swimlane Flowcharts can help identify areas where tasks are duplicated, where there are unnecessary steps, or where bottlenecks may occur, allowing for process optimization.
Support for Cross-functional Collaboration: As Swimlane Flowcharts depict the involvement of different roles and functions, they facilitate collaboration and communication across teams, promoting a shared understanding of the process.
What should be included in a Swimlane Flowchart?
A well-designed Swimlane Flowchart typically includes the following components:
1. Lanes or swimlanes representing different roles/functions: These are the horizontal lanes that separate responsibilities, typically labeled with the respective role or function name (e.g., Customer, Sales, Accounts Payable).
2. Process steps or activities arranged sequentially: Within each lane, the specific tasks or activities performed by that role are depicted in a logical sequence, using standardized flowchart symbols.
3. Arrows showing the flow of the process: Connectors, typically arrows, illustrate the direction of the process flow, linking activities and indicating the order in which they occur.
4. Start and end points clearly marked: The diagram should have a clearly defined start and end point, typically represented by a terminal symbol (e.g., an oval or a rectangle with curved edges).
5. Decision points, loops, or conditional logic (if applicable): If the process involves decision points, loops, or conditional paths, these should be appropriately represented using standard flowchart symbols (e.g., diamond shapes for decisions, and circular connectors for loops).
6. Additional elements (optional): Depending on the complexity and purpose of the diagram, additional components such as data inputs/outputs, system interactions, or annotations may be included to provide further context or clarification.
What is the use case of Swimlane Flowchart?
Use This Swimlane Diagram Template
Swimlane Flowcharts have a wide range of applications across various industries and contexts, including:
Business Process Mapping and Improvement: One of the primary use cases for Swimlane Flowcharts is to visualize and analyze business processes, identifying inefficiencies, redundancies, and opportunities for streamlining and optimization.
Project Planning and Workflow Management: In project management, Swimlane Flowcharts can be used to plan and manage project workflows, assign tasks to specific roles or teams, and track progress effectively.
Software Development and System Design: In software engineering and system design, Swimlane Flowcharts are employed to model system processes, document requirements, and design user flows or interactions.
Standard Operating Procedure (SOP) Documentation: Swimlane Flowcharts are an effective way to document standard operating procedures, providing a clear visual representation of the steps, roles, and responsibilities involved in carrying out specific tasks or processes.
Training and Knowledge Transfer: The visual nature of Swimlane Flowcharts makes them valuable tools for training new employees, documenting institutional knowledge, and facilitating knowledge transfer within an organization.
Process Compliance and Auditing: In regulated industries or environments with strict process requirements, Swimlane Flowcharts can be used to document and demonstrate compliance with established processes, aiding in audits and regulatory compliance efforts.
3 Useful Swimlane Flowchart Templates & Examples
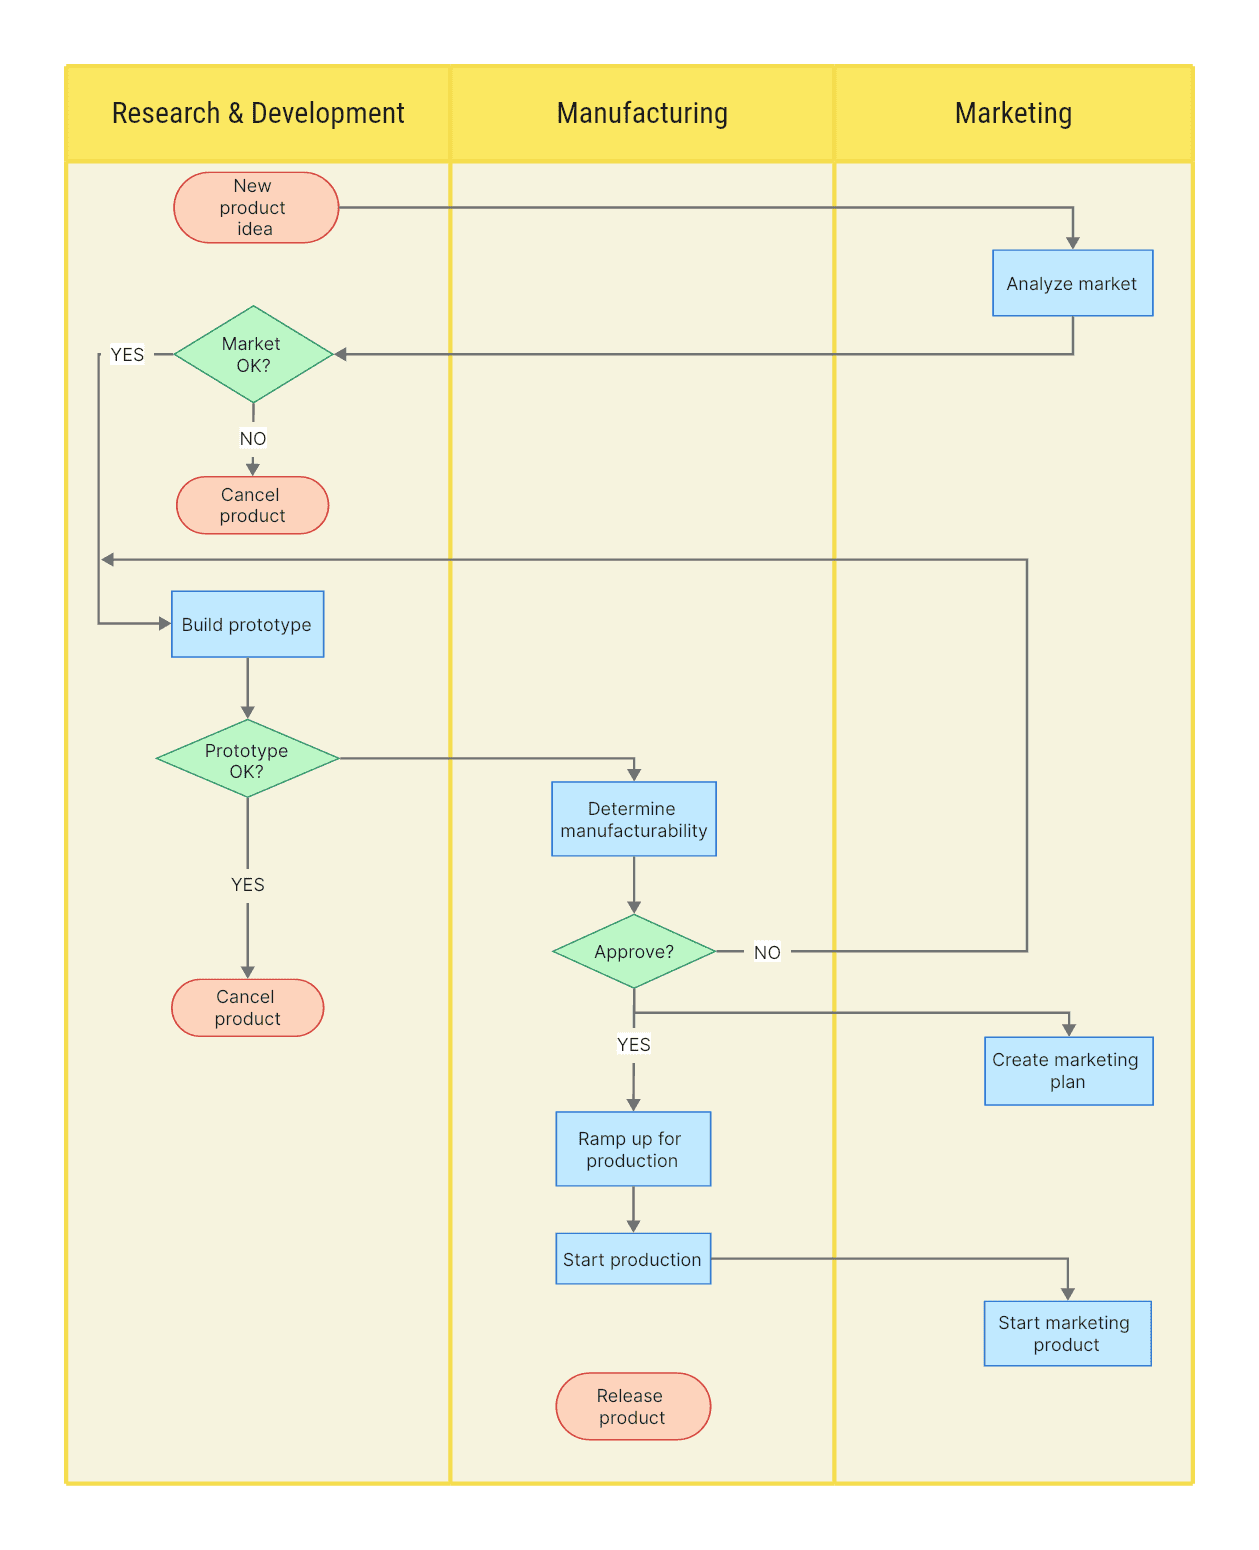
Swimlane Flowchart Templates1: New product development
This diagram illustrates the stages of new product development, such as ideation, concept development, prototyping, testing, and launch. It features cross-functional teams like R&D, marketing, and operations, showing how they collaborate to bring a new product to market.
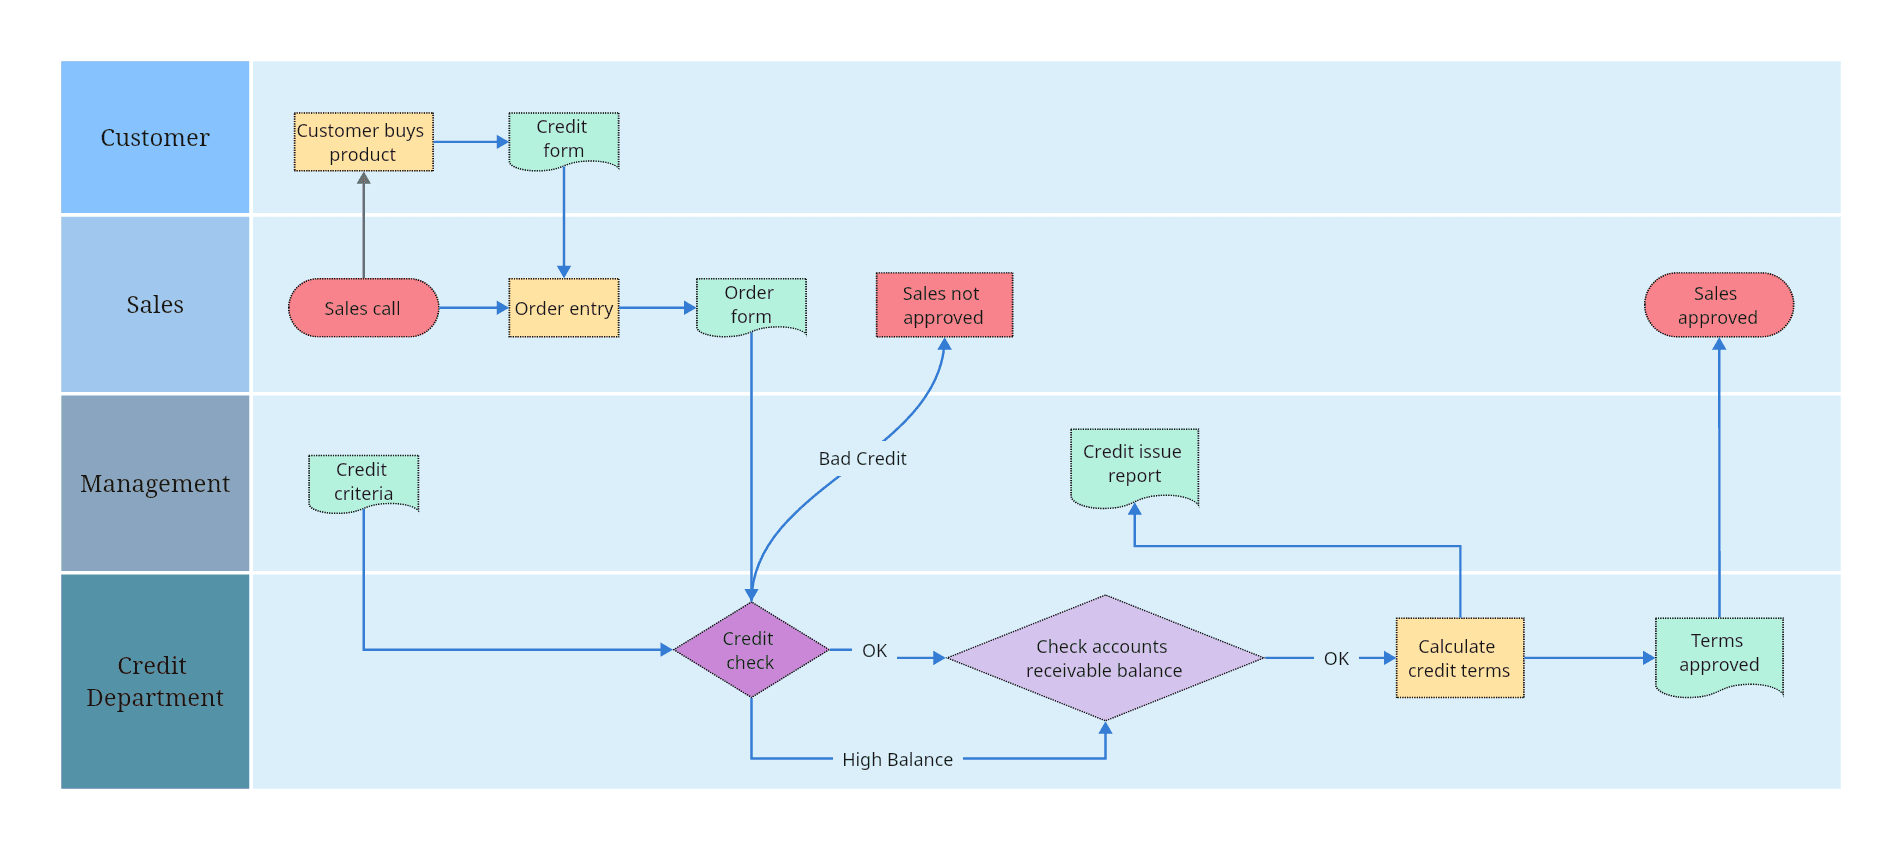
Swimlane Flowchart Templates 2: Credit card approval process
This flowchart showcases the steps involved in approving a credit card, including order entry and credit terms calculation. It involves customers, sales, management, and the credit department, providing a visual representation of how these parties collaborate to ensure a smooth approval process.
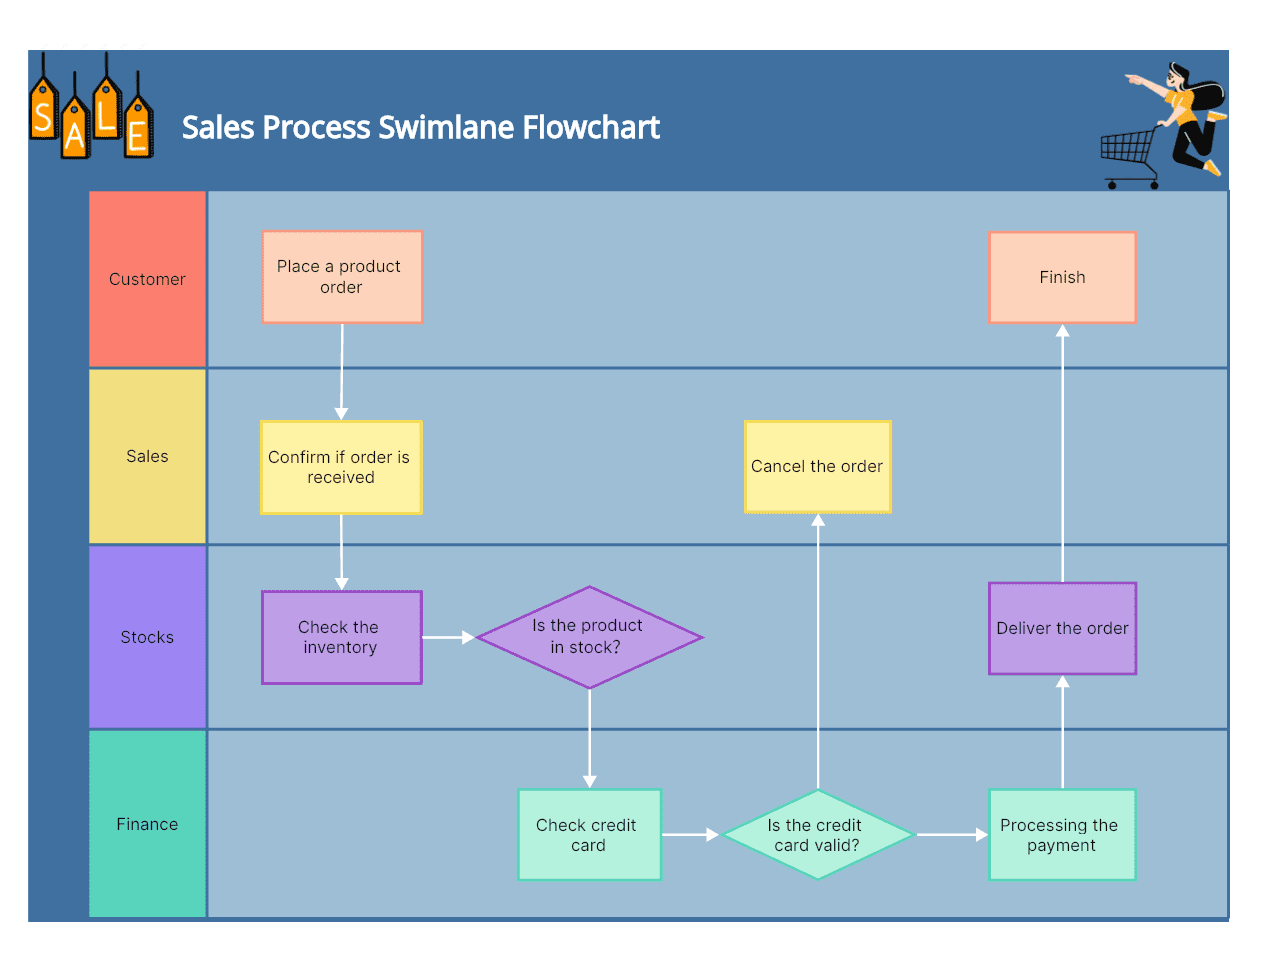
Swimlane Flowchart Templates 3: Sales order fulfillment
This flowchart demonstrates the steps involved in fulfilling a sales order, including order receipt, inventory check, picking, packing, and shipping. It involves sales, warehouse, and logistics teams, illustrating how they collaborate to efficiently fulfill customer orders.
How to Create a Swimlane Flowchart?
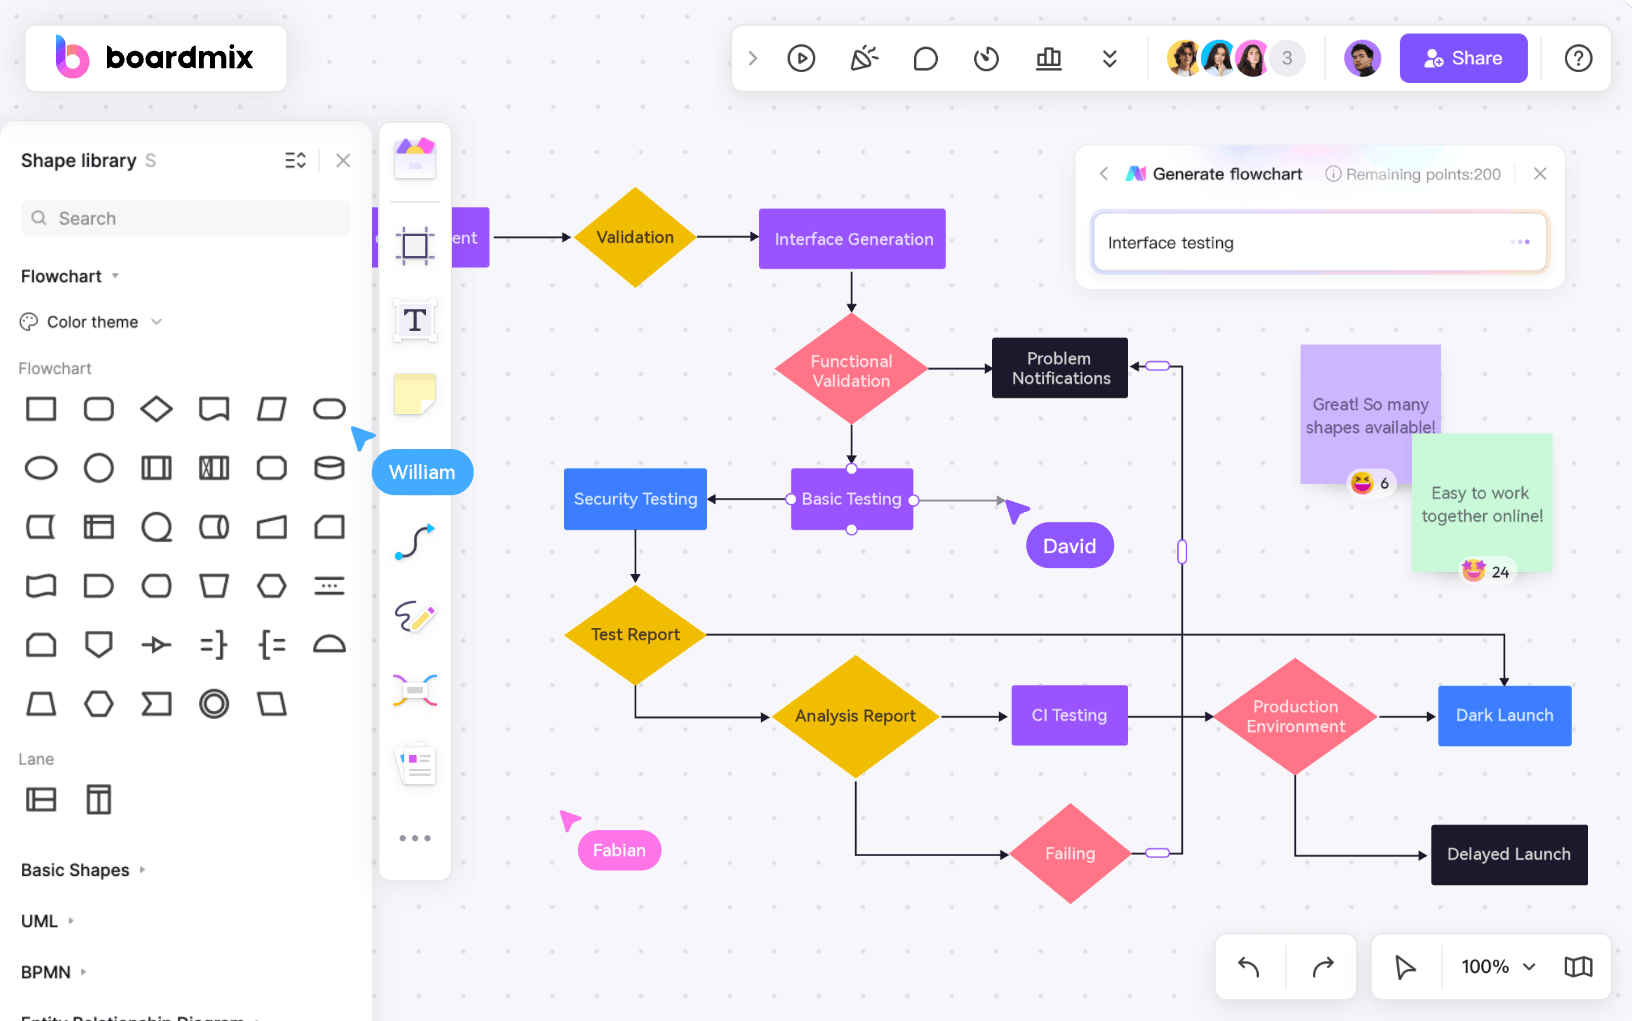
Step-by-Step Guide: Creating a Swimlane Flowchart on Boardmix
Creating a Swimlane Flowchart on Boardmix can streamline your project management and workflow visualization. Here's a step-by-step guide on how to create one.
Draw Your Swimlane Diagram Here
1. Log in to Boardmix
The first step is to log in to your Boardmix account. If you don't have an account, you'll need to sign up first.

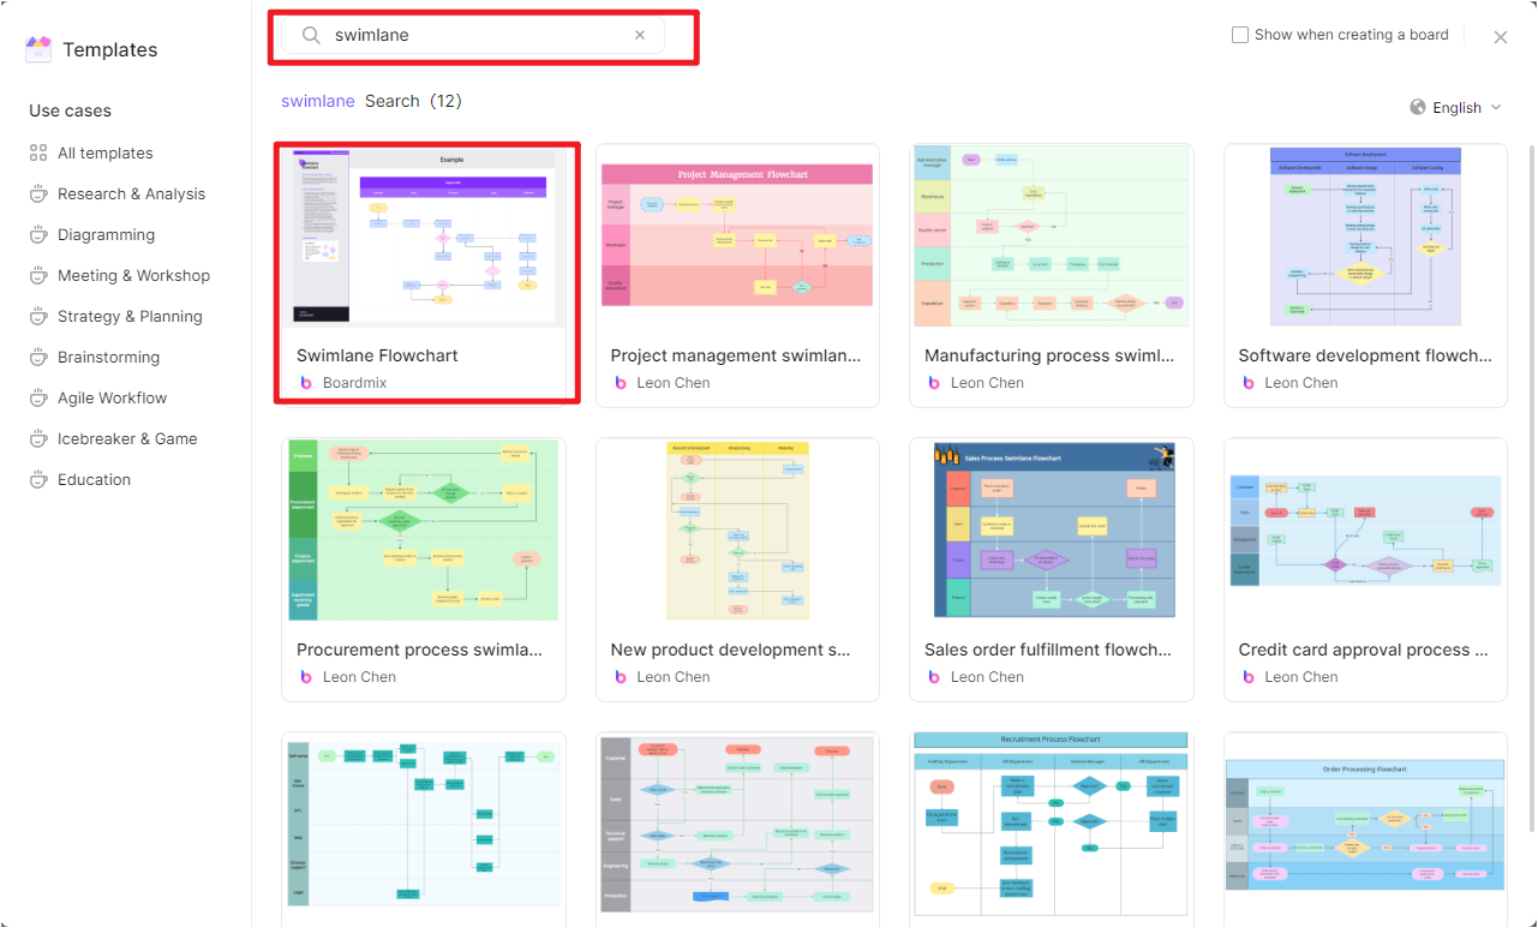
2. Choose Swimlane Flowchart Template
Navigate to the template library, search and then select 'Swimlane Flowchart'. This will open a blank canvas where you can create your Swimlane Flowchart.
3. Add Swimlanes
Add swimlanes to your diagram by dragging and dropping them from the toolbar onto the canvas. You can label each swimlane to represent different departments, roles, or phases of a process, based on your needs.
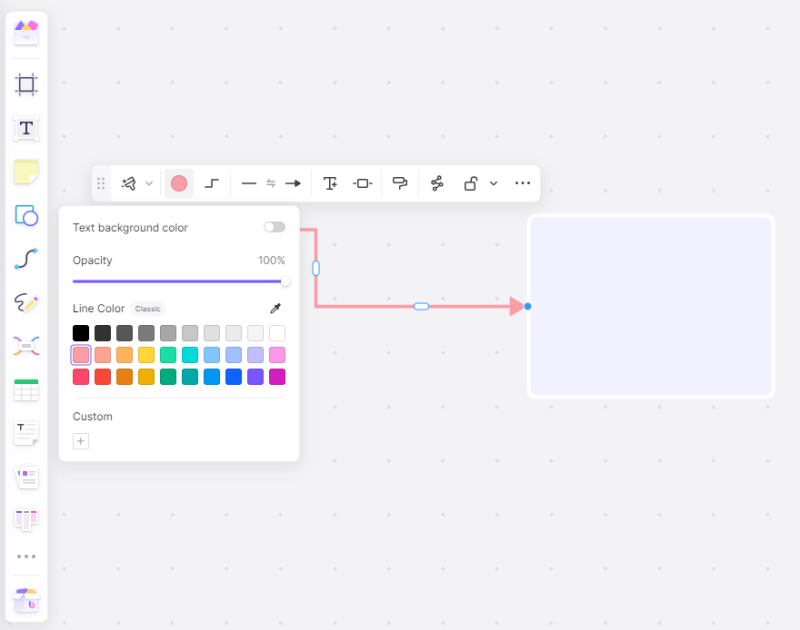
4. Add Process Steps
Next, add process steps inside the swimlanes. Drag and drop shapes from the toolbar onto the appropriate swimlane. Label these shapes to represent the steps of your process.

5. Connect Steps
Use arrows to connect these steps in the order they occur. The direction of the arrows should represent the flow of the process.
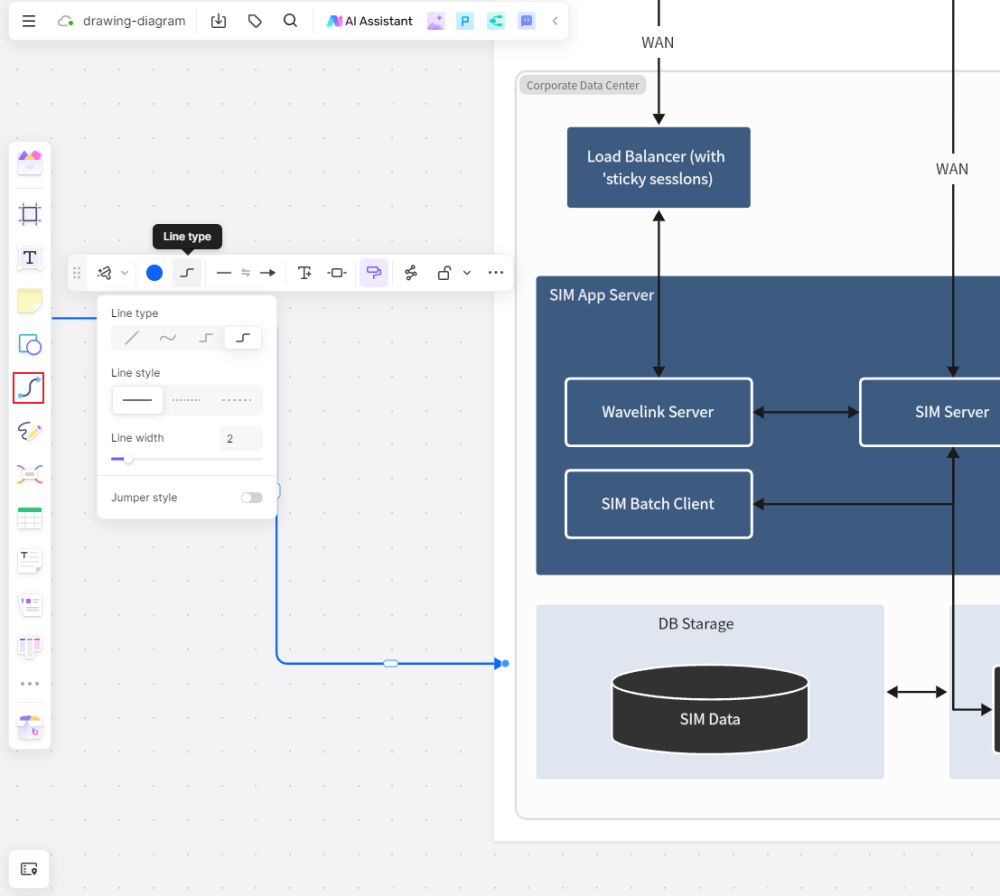
6. Customize Your Diagram
You can customize your diagram by changing colors, shapes, fonts, etc. to make it more visually appealing or to match your company's branding.
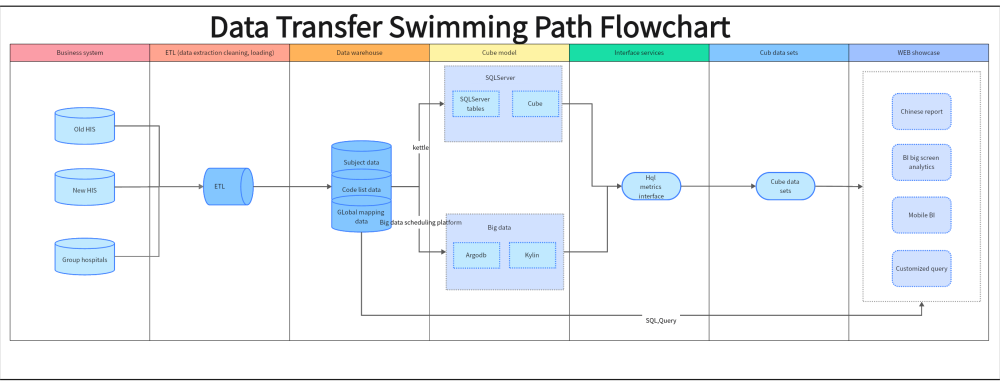
Draw Your Swimlane Diagram Here
7. Save and Share
Once you are satisfied with your Swimlane Flowchart, save it and share it with your team or stakeholders as required.
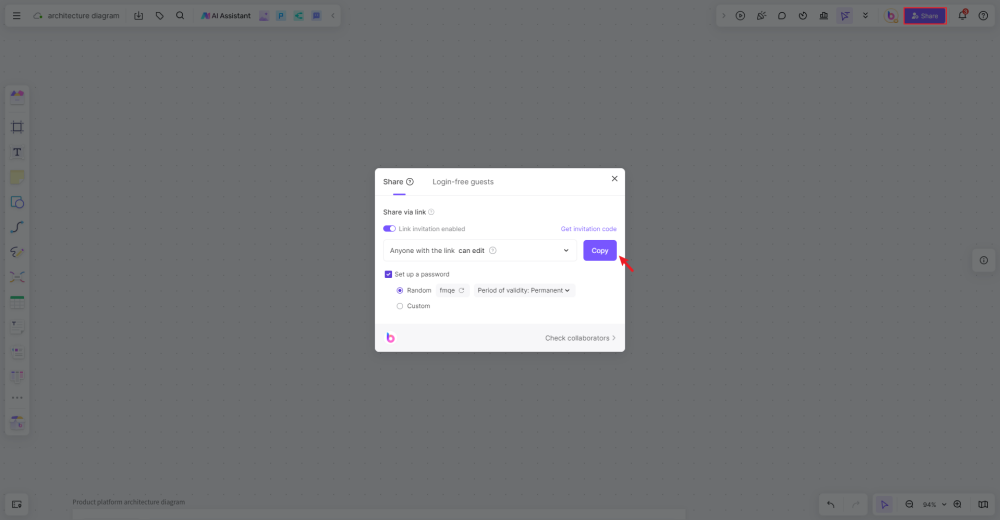
Boardmix makes creating Swimlane Flowcharts easy and efficient. This helps you visualize workflows and processes clearly, enhancing communication and productivity within your organization.
Tips for Effective Swimlane Flowchart
1. Clarify the Process and Its Scope: Begin by clearly defining the process or workflow intended for mapping. Establish the boundaries of the process and identify the specific activities or tasks involved.
2. Outline Roles and Functions: Determine the various roles, teams, departments, or functions that play a part in the process. These entities will serve as the swimlanes in your flowchart.
3. Break Down the Process into Steps: Analyze the process thoroughly and segment it into individual steps or activities. Consider the sequence in which these steps occur.
4. Arrange Steps Sequentially: Within each swimlane, organize the corresponding activities or tasks in the order they occur. Use appropriate flowchart symbols to represent each step.
5. Incorporate Start/End Points and Decision Symbols: Clearly mark the beginning and end points of the process using terminal symbols. Use decision symbols, such as diamonds, to represent any conditional logic or branching paths.
6. Use Connectors for Flow: Connect the activities using arrows or connectors to show the flow of the process. Ensure that the flow is easy to follow and understand.
7. Review and Refine: Once the initial flowchart is created, review it for accuracy, completeness, and clarity. Refine the flowchart based on feedback from stakeholders or subject matter experts.
8. Consider Specialized Diagramming Tools: While basic drawing tools or software can be used to create swimlane flowcharts, consider using dedicated diagramming tools. These tools often provide specialized features, templates, and symbols tailored for creating swimlane flowcharts more efficiently.
FAQs about Swimlane Flowchart
How do you represent different roles or responsibilities within the lanes of a Swimlane Flowchart?
Different roles or responsibilities are represented by dedicating separate horizontal lanes or swimlanes to each one. Each lane is typically labeled with the role or function name, such as "Customer," "Sales Representative," "Accounts Payable," etc. The activities or steps specific to each role are then placed within their respective lanes.
This separation of roles into dedicated lanes provides a clear visual representation of who is responsible for each step in the process. It helps clarify handoffs, dependencies, and interactions between different roles or functions, ensuring that everyone involved understands their responsibilities and how their tasks fit into the overall process flow.
In some cases, a single lane may represent multiple roles or functions if they share similar responsibilities or if the process steps are not differentiated at that level of detail. Conversely, complex roles or functions can be further divided into sub-lanes to provide additional granularity if needed.
It's important to consistently label and represent roles or func tions across the entire diagram to maintain clarity and avoid confusion. Additionally, using standardized symbols, colors, or other visual cues can further enhance the readability and comprehension of the roles and responsibilities depicted in the Swimlane Flowchart.
What is the difference between a workflow diagram and a Swimlane Diagram?
A workflow diagram is a more general term that refers to any visual representation of a sequence of steps or activities in a process. A swimlane diagram, on the other hand, is a specific type of workflow diagram that separates roles or responsibilities into dedicated lanes, providing additional clarity on who does what in the process.
While workflow diagrams can be simple flowcharts, swimlane diagrams offer a more structured and role-based approach, making them particularly useful for cross-functional processes involving multiple teams or departments.


