A flowchart is an essential graphical representation to help you to identify the crucial steps of a particular process. Organizations make use of flowcharts because it organizes tasks chronologically and can be easily interpreted by anyone.
Most organizations make use of Word to document their business strategies. Therefore, they may need to include a flowchart when organizing these important details.
This blog will teach you how to create a flowchart in word - both Microsoft and WPS. Let’s move on.
Part 1. How to Create a Flowchart in Word
In this blog, we will learn how to create a flowchart in both Microsoft and WPS in detailed steps.
1.1 How to Create a Flowchart in Microsoft Word
Step 1. Open a new Microsoft Word file. Head over to the Insert tab, and click on SmartArt.
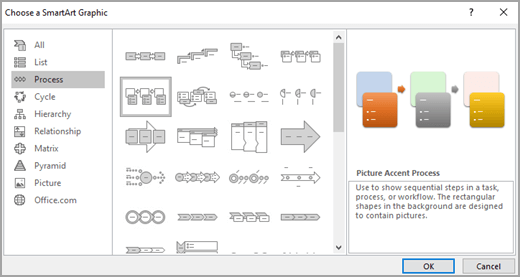
Step 2. Once the SmartArt Graphic pop-up appears in front of you, head over to the Process tab and select the Picture Accent Process graphic.
Step 3. To add an image to the box, you can click on the picture icon above and select the image you want to display in that particular box of the flowchart by clicking on Insert.
Step 4. To add text, you can click [Text] in the Text pane, and you can type the text. You can also click on the box of the graphic, and type your text as well.
Step 5. For further customization, you can head over to the SmartArt graphic and add more boxes by going to the Design tab, and in the Create Graphic group, you will find an Add Shape option. As a result, you can insert a box either by selecting Add Shape Before or Add Shape After. In addition, you can remove boxes by clicking on them and pressing delete.
Step 6. Finally, it is time to bring some lively colors to your SmartArt graphic flowchart. On the Design tab again, you can find the Change Colors option. Then, you can select the color combination you like. Moreover, you can also right-click on each box you want to modify and select Format Shape. In the Format Shape section, you can fill in the colors you like and modify the design as per your needs.

Source: Microsoft
1.2 How to Create a Flowchart in WPS Word
Step 1. Open a new Word file. Click on Insert, and then click Shapes. Then, you can select New Drawing Canvas and add it to your file.
Step 2. Click Insert, and head over to Shapes. You can go to Flowchart and select any shapes you want that relate to your flowchart. After adding one shape, you can press Ctrl and drag it to create duplicate shapes with ease.
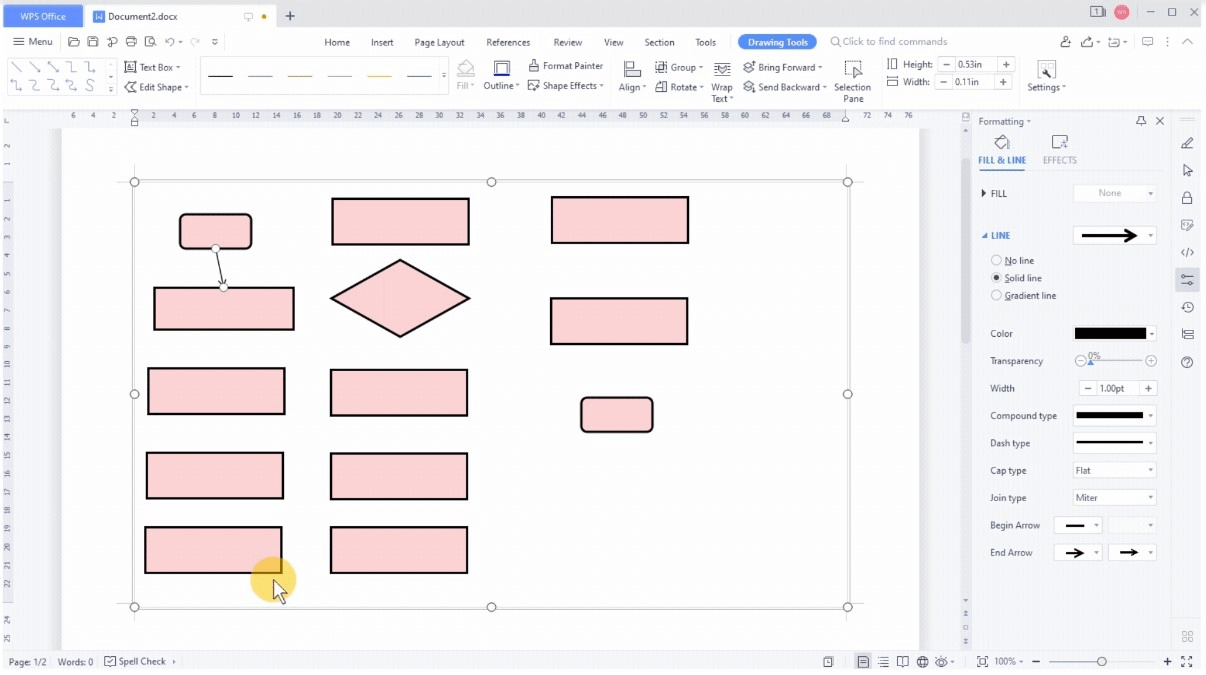
Step 3. Next, we need to connect lines. From the toolbar above, you can insert different types of lines. Once inserted, you can select the line and click Formatting to modify the weight and color of each line.
Source: WPS
Step 4. Now, you will need to add text to your flowchart. You can right-click each box and select Add Text. Then, you can enter the text you want and label each box. Moreover, you can adjust the alignment of every shape to make them look good and also the angle of each connecting line.
Part 2. How to Easily Create a Flowchart with Free Templates
Despite learning each detailed step of creating a flowchart in Word, it can seem to be more time-consuming for users. Hence, it is ideal to explore an alternate solution that helps to make you more efficient and removes the hardships of creating each flowchart again and again.
I am talking about using free templates and using them unlimited number of times in your projects. Let us explore a tool that can help you with that.
Boardmix is an online collaborative whiteboard that helps users to:
- Create more than a single flowchart and other diagram tools.
- Add and remove boxes in a flowchart with ease.
- Drag each element freely in an easy-to-use interface.
- Make use of templates available in the user interface and also in the design community.
- Save changes automatically—making it a safe platform and users won’t need to worry about lost progress.
- Do everything online since there is no need to download it.
- Export your flowchart templates easily as .png, .jpg, .pdf, .svg, and .bdx (Boardmix format) files.
Let us now learn how to create a flowchart on Boardmix.
2.1 Creating a flowchart from scratch
Step 1. Open your new Boardmix file. In the canvas insert a frame by clicking on the frame icon on the left-hand side panel or pressing the F key. Insert a frame if you wish to contrast your flowchart well with the background.
Step 2. From the left-hand side panel, explore different shapes by clicking on the shape icon or pressing the S key. You can insert triangles and rectangles to represent your flowchart elements. You can drag each corner of the shape and adjust the dimensions of the shape easily.
Step 3. Then, you can add color to each shape by selecting the shape and exploring its formatting options. Moreover, you can add text to each shape by clicking on the text icon or by pressing the T key to label all your flowchart elements.
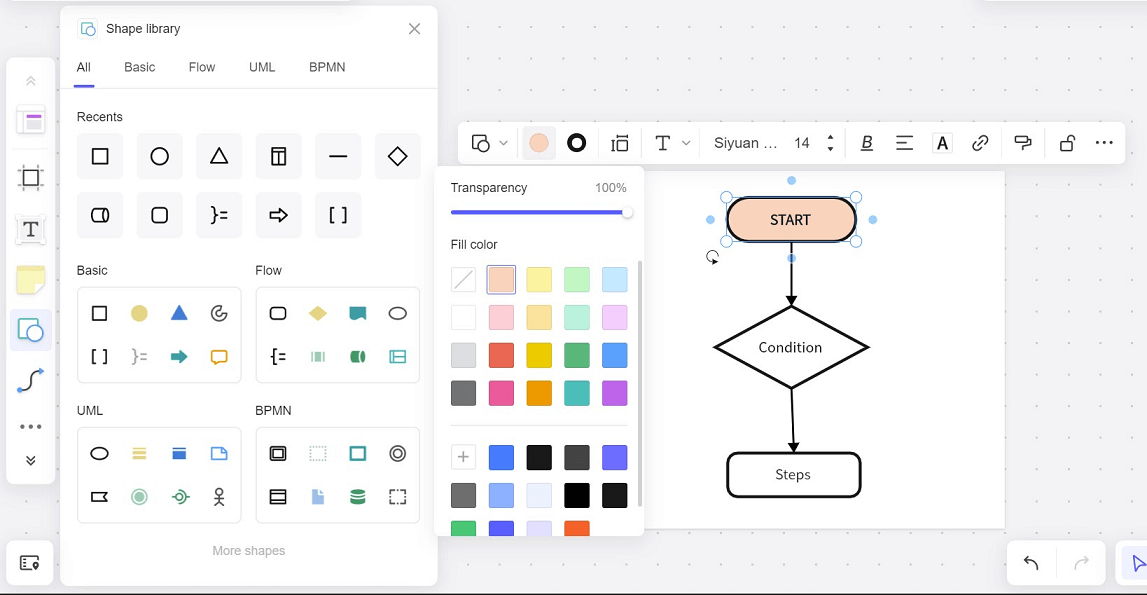
Step 4. Finally, connect your flowchart by choosing the connection line tool from the left-hand side panel or simply pressing the L key. Over here, you can find lines with arrows and without arrows to perfectly connect each flowchart element and make a proper flowchart.
2.2 Using flowchart templates
Step 1. Another quick and easy way to make your flowcharts is by simply heading over to the template section. Click on the template icon on the left-hand side panel. Once the template pop-up box appears in front of you, head over to the Draw & Diagram section and add a Flowchart to your canvas.
Step 2. Insert your flowchart into your Boardmix canvas. Then, you can easily edit each shape and connection line according to your flowchart requirements. Use this method when lacking time and inspiration to make flowcharts.

Part 3. FAQs About Flowchart in Word
Q1. Are there flowchart templates in Word?
Yes, there are flowchart templates available in Microsoft Word in particular when utilizing SmartArt graphics.
Q2. Is it easier to create a flowchart in Word or Excel?
When it comes to creating flowcharts between the two, Excel is an easier tool and is a better alternative for flowchart mapping requirements.
Start Making Flowcharts in Boardmix…
In this blog, you have learned three ways to create a flowchart. Making use of templates is an easy way to remove redundant work and keep delivering perfection in your projects.
Make use of Boardmix and create unlimited flowchart templates catered to your business goals and have them ready by your side always.