Architecture diagrams are essential tools for visualizing and communicating the design and structure of a system or application. Whether you are an architect, a developer, or someone involved in IT planning, creating clear and concise architecture diagrams is crucial for conveying complex ideas. In this guide, we'll walk you through the steps on how to draw architecture diagrams effectively.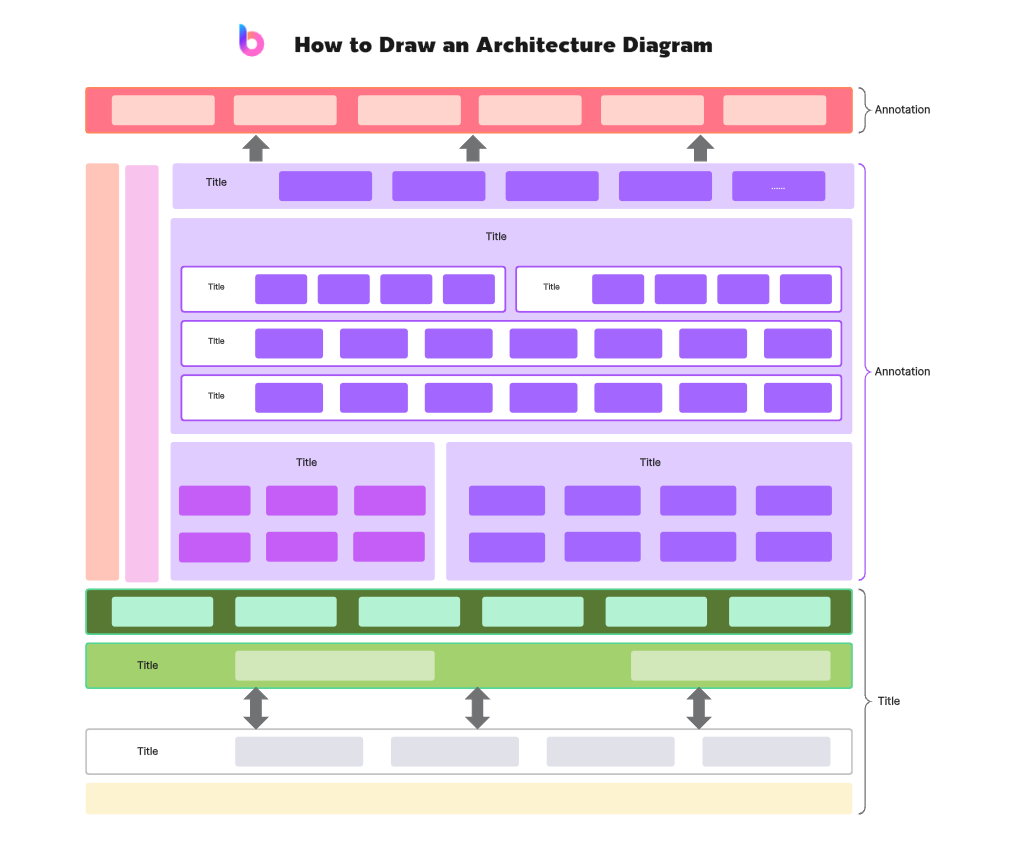
Part 1. What Is a Good Architecture Diagram?
A good architecture diagram effectively communicates the design and structure of a system in a clear and concise manner. Here are key characteristics of a good architecture diagram:
- Clarity: The diagram should be easy to understand, even for individuals who are not deeply familiar with the system. Use clear labels, symbols, and a logical layout to enhance comprehension.
- Simplicity: Avoid unnecessary complexity. Focus on the most critical components and relationships to prevent overwhelming the viewer with excessive details. A good diagram strikes a balance between completeness and simplicity.
- Consistency: Maintain consistency in the use of symbols, notations, and formatting throughout the diagram. This consistency enhances readability and helps viewers quickly interpret the information.
- Hierarchy: Organize components in a hierarchical manner to illustrate different layers and their relationships. This layered approach provides a structured and modular view of the system.
- Detail Gradation: Start with a high-level overview and gradually add more detail. This allows viewers to grasp the overall architecture before delving into specific components, making the diagram accessible to a broader audience.
- Standard Symbols: Use standard symbols and notations widely recognized in the field. This ensures that your diagram is easily interpretable by professionals and stakeholders who may be familiar with industry-standard conventions.
- Annotations: Include clear and concise annotations to provide additional information about components, connections, and key considerations. Annotations enhance the viewer's understanding of the system's intricacies.
- Alignment: Maintain a neat and organized layout with consistent alignment of components. A visually appealing diagram contributes to better comprehension and a positive impression.
- Purposeful Color Coding: If using colors, do so purposefully. Color coding can help highlight different types of components, relationships, or specific areas of interest. However, ensure that the colors are not distracting and serve a clear purpose.
- Feedback Incorporation: Gather feedback from stakeholders or team members and refine the diagram accordingly. An iterative approach ensures that the architecture diagram accurately reflects the system's design and meets the needs of its intended audience.
Remember, the goal of an architecture diagram is effective communication. A good diagram facilitates understanding among diverse stakeholders, aiding in decision-making, collaboration, and successful implementation of the system.
Part 2. How to Draw an Architecture Diagram?
Drawing an architecture diagram involves several steps to ensure clarity and accuracy in representing the design and structure of a system. Here's a step-by-step guide on how to draw an architecture diagram: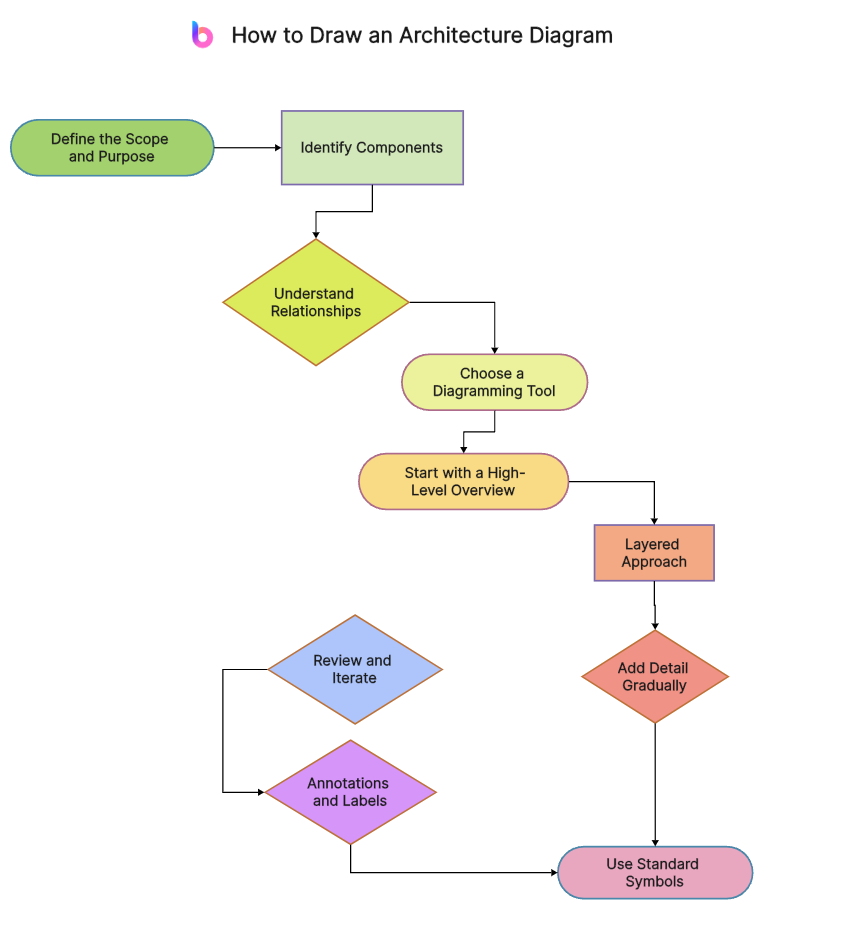
Step 1: Define the Scope and Purpose
Clearly understand the purpose of your architecture diagram and identify the key components and relationships you want to represent. Define the scope to focus on the most relevant aspects of the system.
Step 2: Identify Components
List and identify the main components of your system. This could include servers, databases, services, and other key elements. Understand the roles and functionalities of each component.
Step 3: Understand Relationships
Define the relationships and connections between the identified components. Consider data flow, communication channels, dependencies, and any other interactions. Clearly articulate how the components interact with each other.
Step 4: Choose a Diagramming Tool
Select a diagramming tool that suits your needs.These tools offer features to create professional-looking diagrams with ease.
Step 5: Start with a High-Level Overview
Create a high-level overview of your architecture. Begin with a simplified diagram that illustrates the main components and their interactions. This overview will serve as a roadmap for the more detailed components you'll add later.
Step 6: Layered Approach
Break down the system into layers (e.g., presentation layer, business logic layer, data layer) and represent each layer separately. This modular approach enhances the organization and clarity of your architecture diagram.
Step 7: Add Detail Gradually
As you progress, add more detail to your diagram. Include specifics about each component, such as the technology stack used, interfaces, and data storage. Ensure that your diagram is comprehensive but not overly complex.
Step 8: Use Standard Symbols
Employ standard symbols and notations to represent different components and relationships. This ensures that your diagram is easily understandable by a broad audience. For example, use rectangles for components, arrows for connections, and clouds for external services.
Step 9: Annotations and Labels
Include annotations and labels to provide additional information about components and connections. Clearly label each component and use text to explain key features or important considerations.
Step 10: Review and Iterate
After creating the initial draft, review your architecture diagram for accuracy and clarity. Seek feedback from team members or stakeholders and make necessary revisions. Continuous iteration will result in a more refined and effective representation of your system's architecture.
By following these steps, you can create a comprehensive and clear architecture diagram that effectively communicates the design and structure of your system.
Part 3. Simplify Architecture Diagram Drawing with Boardmix
Boardmix is an innovative online whiteboard tool that revolutionizes the way you create architecture diagrams. With a vast library of customizable templates, it streamlines your design process, making it easier and faster than ever before. Whether you're sketching out initial ideas or detailing complex systems, Boardmix's intuitive interface and powerful features help to bring your vision to life. Plus, with real-time collaboration capabilities, you can work seamlessly with your team from anywhere in the world.
How to Draw an Architecture Diagram with Boardmix:
Step 1. Sign up/in to Boardmix
Go to www.boardmix.com and sign up an account or login to an existing account.
Step 2. Create a board
Click the + icon on the Home page. Then from the pop-up window, choose a template you want. You can choose Architecture Diagram template here.
Step 3. Edit the template
Use the toolbar to add texts, change the background color and so on.
Step 4. Collaborate with others.
You can share the board with your colleagues or teammates and collaborate in real-time on Boardmix.
Conclusion
Creating architecture diagrams is a crucial sksill for anyone involved in system design and development. By following these steps and leveraging the right tools, you can produce clear and insightful diagrams that effectively communicate the structure and design of your system. Remember that the goal is to make complex ideas accessible, so prioritize clarity and simplicity in your architecture diagrams. With a tool like Boardmix, you don’t need to worry at all. It will simplify the process you create an architecture diagram. So, get the free trial right now!


